This is where I lay out how we are adapting our new home to fit our needs and wants. Both immediate and long term (future projects) to be discussed under this Infrastructure category.
In our location, we have access to nearly 20 sawmills within 10 miles – with a small Amish mill right across the road where I get a lot of freshly cut pine. That pine is not kiln dried or treated in any way so I need to work against warping (as it dries) as well as preservation going forward.
Up to now, my method was simply to get someone to paint eventually but that’s not ever a huge priority for me and some gates, fences and outdoor projects remain completely natural – with the expectation I’ll need to replace in a few years when they eventually rot.
I think I will give this a try. With a very modest “Cylinder Index” of only 30+/Rural, I will still certainly have a regular and ample supply of used oil available.
Cylinder Index The Cylinder Index (or C.I.) is a measurement device in which the total number of internal combustion engine cylinders (working or non-working) owned by an individual (single-cylinder chainsaws, lawnmowers, 2-cycle, 4-cycle, multi-clinder diesels, trucks and farm tractors) are tallied. The Garage Logician who attains a C.I. in excess of his age is revered. – Joe Soucheray, Mayor of Garage Logic.
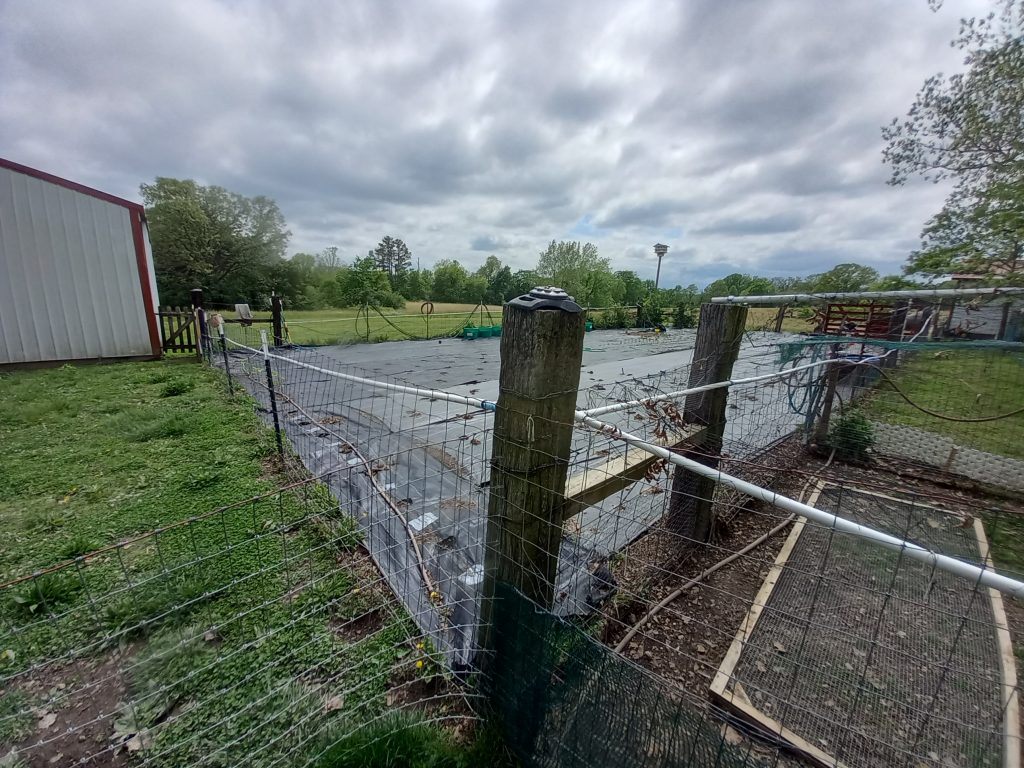
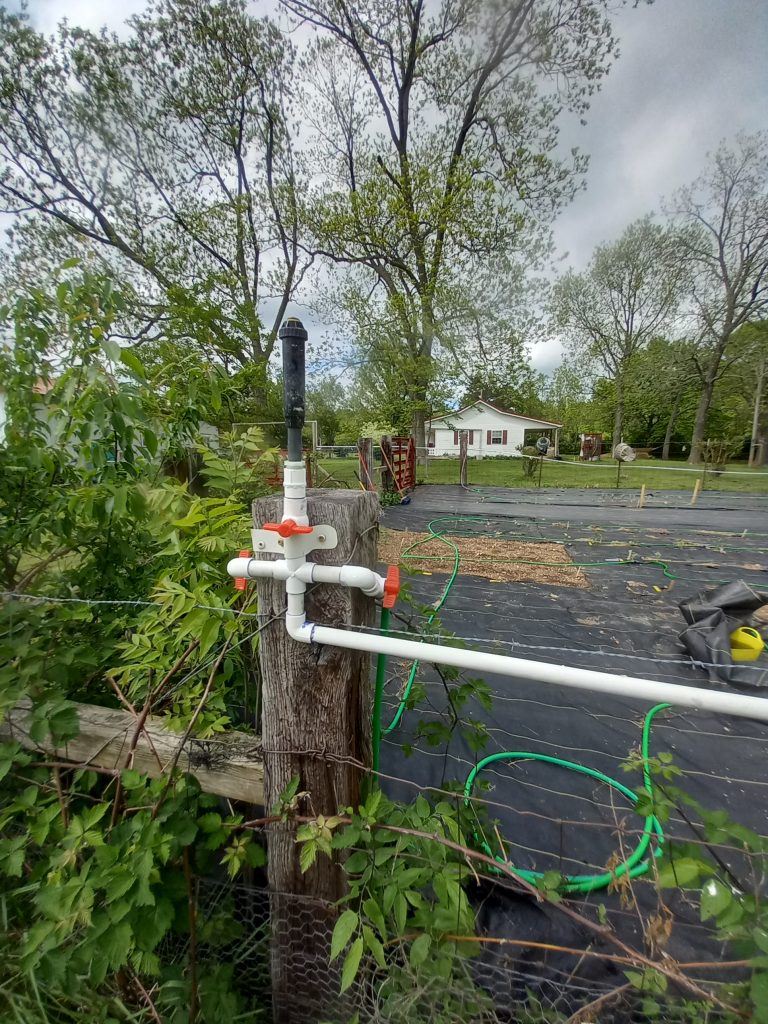
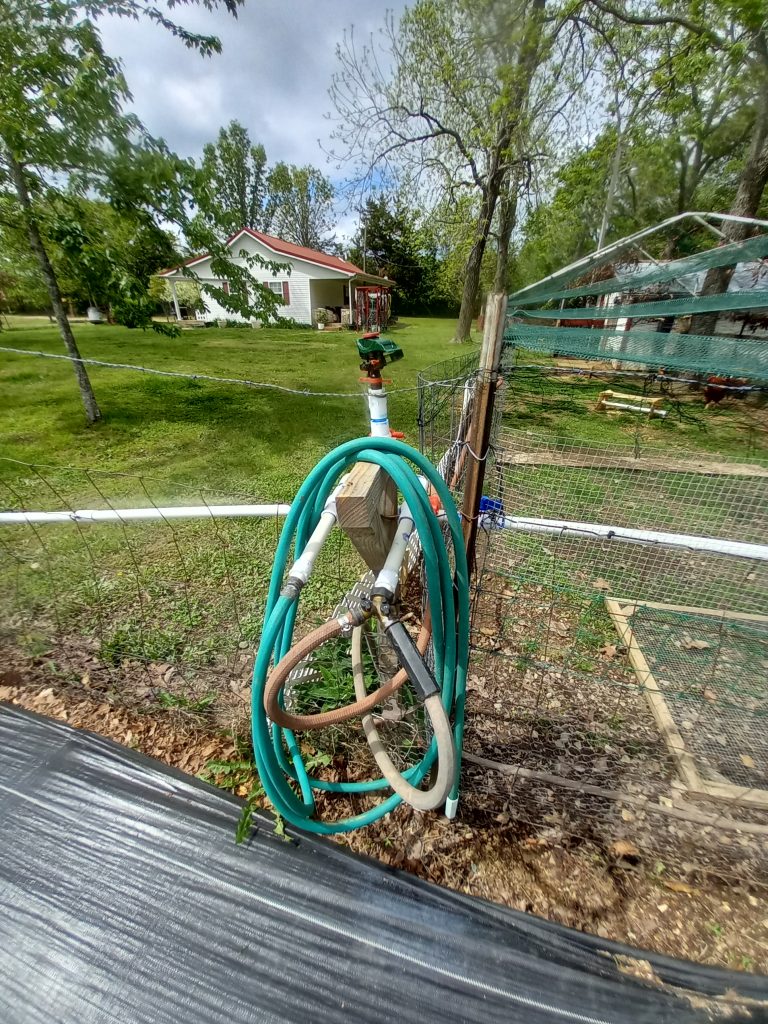
Today was the annual springtime plumbing day. With an extensive above ground PVC plumbing network, periodic repairs are a necessity. This encompasses addressing freezing issues as well as upgrading for better functionality. Most of todays effort was to replace the line at the eastern edge of the garden. That line also feeds the southern edge and a simple garden hose has been temporarily bridging that gap since the previous piping froze and split.
Being the pack rat that I am, I utilized the pvc piping that I attempted to cover the pool with this past winter. That effort failed miserably so was glad to repurpose that piping where I know it will make things easier.
Luckily, I had many apprentices assisting me today.
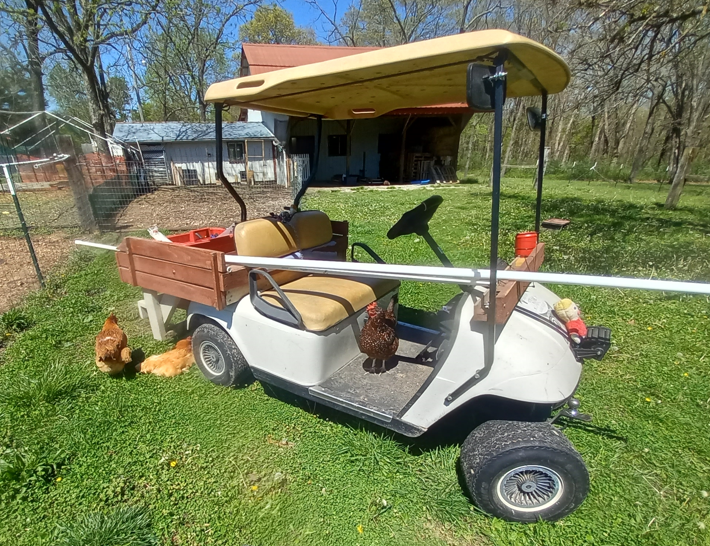
Any time I bring the work cart into their run the chicks get excited and swarm all over everything I am doing out there. It gets to the point that there are so many clustered around, when it is time to leave I need to crouch down and make sure I won’t drive over any hiding underneath. They also like to stowaway in a cubby under the work deck in back and I’ve driven back to the garage to find them hiding under there.
Anyway, from our single outside water faucet located just off the back porch, I’ve expanded water access to reach all the essential areas of our operations with 27 faucet/access points distributed where needed.
This is at least the 3rd time I was puzzled about how to get a tree/limb down SAFELY (without me ending up paralyzed). Plus, I also seem to always deal with these when I am on my own (with no one around to call 9-1-1).
This limb while not all that large was snapped off and hung up in other branches between the garage and the house.
I noticed this up there a few days ago. It’s not that big but could definitely injure someone falling from high in the tree so I contemplated my options.
To saw it clean, I might have been able to reach it with my tallest ladder set up in the back of my truck bed backed up to the tree. But there is nothing worse than trying to make a cut with a chainsaw while precariously perched high in the air.
The other option was to try to throw a rope around it to pull it down. To get close enough to it would also require the ladder in the pickup trick but wouldn’t be nearly as high and a simple throwing motion is better than operating a chainsaw.
Luckily, nature AGAIN took care of it for us, as it was laying on the ground when we got up this morning.
Although the “nub” will still bother my sense of order and should be cleaned up, the fact it is 40′ in the air will temper my urge to get after it.
As with the large dead pine across the field from the 1st above photo, that I sawed nearly through and ended up binding my saw. I was able to pound a wedge in to free the saw but the tree remained standing. Rather than accept any more risk, I simply backed away and left it there at the edge of our field. In a matter of 2 or 3 days, the wind did the rest. Once it fell, I retrieved my wedge and cut it up for firepit fuel. These have already been used for a few Viking Funerals for dead critters.
The other was another large pine that blew against it’s neighbors on the edge of the woods behind the shop. My saw was too small for the trunk so a neighbor friend came over with a larger saw to saw it free from the root ball still mostly embedded in the ground. We then chained it to his truck but there was no way we were pulling it down – it stayed hung up in the trees. My next idea was to wait until haying season and try to pull it down with the tractor we hired for that. Since haying season was still months away though, I wasn’t keen about keeping everything away from there. Luckily, the wind dropped the tree to the ground a day later. With the return of high tick season, I tabled further work there and still have plenty to cut up when cooler weather returns in the fall. There is also a nice oak that the pine blew into. It didn’t kill it (yet) but that has a notable lean to it as well and I’ll be harvesting that one for heating wood as the ample pine available is only burned outside in the firepit.
As I mentioned earlier, We are filling our pool using rainwater this year.
Rainwater collection for the pool.
I have also tied in the back of the house since this picture.
The good?
Natural (ample over time) water source.
Doesn’t tax the well and pump.
Water is naturally softened and balanced in PH/alkali content.
The bad?
Until the pool is nearly full and the pump/filtration can be activated, the untreated collected water is stagnating in the sun. In the interim, I set up a simple sump pump to run through the filter system to keep the water moving during this filling stage.
Collected water is (or quickly turns) greenish brown. Much appears to be sediment that can be brushed/swept away. Once the level reaches the filter basket and the main pump is active, a thorough vacuuming of all pool surfaces should greatly clear up the murkiness and the chemicals should do the rest.
Update 20240518: With the pool now full (mostly pump/well at 1″ per hour – as the forecasted deluges never materialized), I am switching into clean up mode. The problem is it appears our 1 year old pump is now bad. After a few weeks of collecting stagnant untreated water, it was quite putrid originally. Once I realized our pump wasn’t pumping, I swapped in a sump pump I had on hand and forced that through the pump/filter housing. After a few hours, the water cleared up considerable. However, what I really need to do is thoroughly vacuum every surface to get all of the pollen and other sediments that landed in the pool along with the seeds from the various trees. However, I can’t do that until I have a working pump running from the debris basket to the pump/filter and that won’t be delivered for a few days yet.
Damn. And we’ll be getting close to 90 tomorrow.
UPDATE 20240616: The completed pool project is working wonderfully. Here is my final solution.
Besides making MacGyver insanely jealous, there is a method to the madness. All rainwater from the gutters flows into the pool via the elevated pipe in the middle. It is elevated because that is a regular walking path. Then, starting on the far right, that gray object beneath the ladder is where the water is supposed to flow back into the pool after the pump. However, it wasn’t until the pool was filled that I discovered this was plugged (maybe a mud dauber) so I bypassed this and have the hose from the pump (white hose beneath ladder) flowing directly into the pool. I then installed a valve below the new filter basket so I can work on pump/filter issues without the pool draining down to the bottom of the basket. The nearly horizontal hose traversing right to left is for when we flush (backwash) the sand filter and discharges close to the ground. The little “U” shape hose in the middle does nothing. This pool came with multiple options and this could be used for a heater but we don’t need it so we simple ran a hose from one connection to the other. I could also simply plug each one but haven’t found anything suitable. The hose coming from the left is another “option” that wasn’t used. However, now with rainwater pouring in during storms, this keeps the pool from overflowing and the water depth can be adjusted simply by turning this fitting to the desired level. All overflow water flows out the same discharge as the backwash/rinse modes of the sand filter. On forecasts of heavy storms or rain, I’ll hook up our RV drain hose to that discharge so the flood flows downhill away from the yard.
I know that is more than anyone cares to know but just know this set up is working “swimmingly”. (Sorry, I couldn’t resist).
Last year, we just set the pool up in the middle of the yard, trying to catch sunlight and avoid being under the pecan trees (for obvious reasons). It wasn’t ideal (too close to the chicken run) so we decided to relocate it closer to the house.
We intended to set up at the south end of the house, so that meant removing 2 huge limbs on the 2 pecan trees above.
There is nothing more fun than operating a chainsaw while perched high on a ladder!
We did the first one (#2 above) a few weeks ago. It was pointing straight to where this pic was taken from – slightly overhanging the fence in the foreground. Hoping to avoid the fence, I cut the “hinge” so it should fall to the right into the yard. I had to take down the line of lights that ran from the house to the garage as well as our network cable suspended above (just below yellow line).
I was paranoid about it kicking out the ladder I was perched high up on so I positioned the ladder opposite the limb as much as possible but made the cutting action very awkward. It safely fell but it DID also wipe out that section of fence. Oh well, it was separating from the post anyway and needed attention. Luckily, I only had to replace that 1 section next to the gate.
For the other tree (#1), this wasn’t as high so was easier to get at. From the ground, I estimated that the very tip of the falling limb might brush the lights/network cable that were reinstalled after the first limb was removed. Turns out 8″ or so DID brush the line but were very small branches and the line wasn’t damaged at all. I cut the larger sections into 4′ lengths – hoping to mill it down to be usable for building projects and the smaller sections were cut up for firewood to be used next year. I was surprised at how much wood we got out of those 2 limbs but both were 12+” diameter at the base.
Yesterday, with a rare nice day in an endless string of monsoons and storms, we got the pool set up and used the well to put in the first 8 or 9 inches of water while we smoothed out the bottom.
However, rather than taxing our well/pump, we’ll be using the storms to fill it the rest of the way, rather than turning the yard into muck.
Rainwater collection for the pool.
One of our goals is to eventually capture as much rainwater as possible – from all 4 buildings so this is the first stage of that. Rather than dropping into a bucket (or pooling up in the yard), I rerouted the front side gutter to turn the corner to continue down the side of the house. In the middle (between the bedroom windows), I put in a downspout that typically fills a rain bucket. With a simple (temporary) modification, it will now fill the pool. In a couple hours time, I could (and will eventually) tie in the back side gutters the same way. Now, I am curious to see how quickly it fills.
Once filled, we’ll strain out the larger debris (and bugs) and the pool pump, filters and Roomba type pool vacuum will take care of the rest. Once clear, I can treat the water to the right PH/chlorine balance just as we did previously.
One concern is that until it is filled, the pool is vulnerable to wind damage from storms so will be watching the forecast closely and will remove the legs (and lower the profile) by dropping the top ring down onto the rest of the pool.
We’ll experience this season as it is to be certain we like the location but the plans are (if we like it) to recess the pool halfway into the ground and then build a simple deck around part or all of it.
Finally, I had been noticing my zero turn wasn’t cutting very well so I winched it up in the shop and saw this.
That’s a new (black) blade behind an old one removed from the mower. I’d call it a bit worn, wouldn’t you?
All 3 blades were quite mangled and is why I noticed uncut lines in the mowing path as they no longer overlapped as they should.
Now, I need to refrain from using the zero-turn for the rough stuff and save that work for my “NASCAR” tractor. That’s my old Craftsman with a broken front axel that only turns left. I bought a welder to fix it but first I need to learn how to weld.
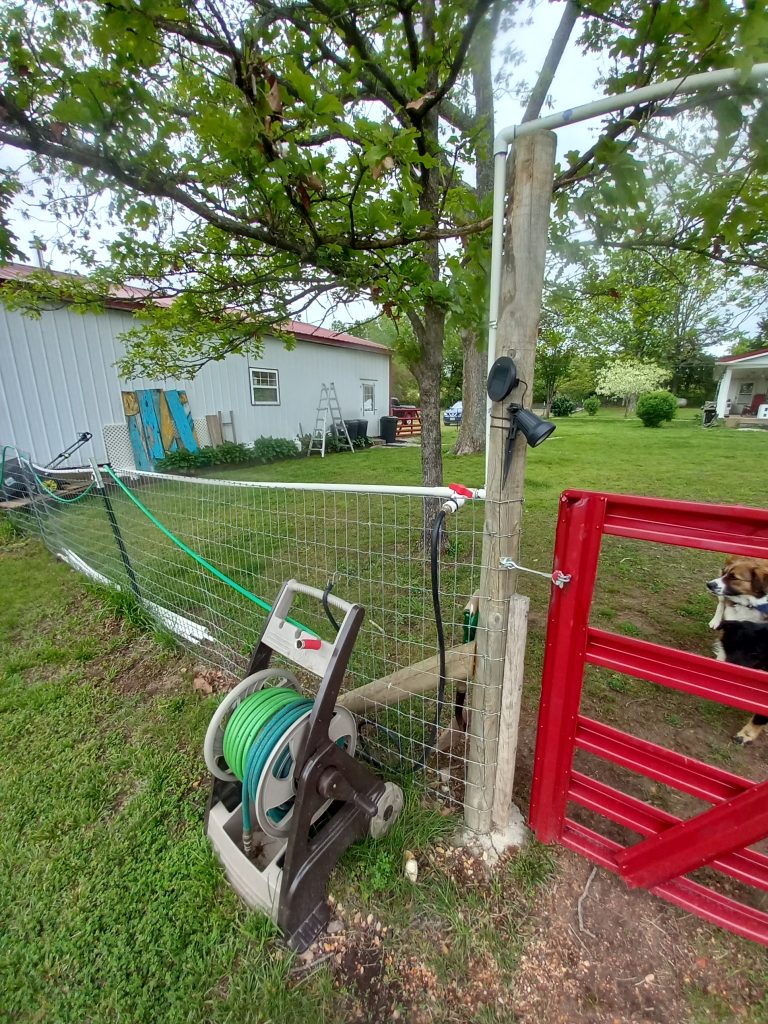
I’ve been asked about how we keep everything watered. It’s not as easy as it sounds with everything spread out and only a single water source available but I’ve been working/adjusting/tweaking this for over a year now and is getting just about ideal for us now.
As Sherry knows, I am pretty anal when it comes to this and am not a fan of constantly hooking/unhooking/untangling hoses and dragging them around. Added to that is the absolutely terrible quality of most products sold for this purpose. I’ve rarely ever had a nozzle, sprinkler, hose or any other component of these last more than 2 years so my goal was to eliminate their incompetence by doing as much on my own as possible.
Everything (in pots/tubs) on the porch is watered by hand using rainwater collected in tubs below the downspouts so no big deal but for everything else, we needed closer sources to get the water.
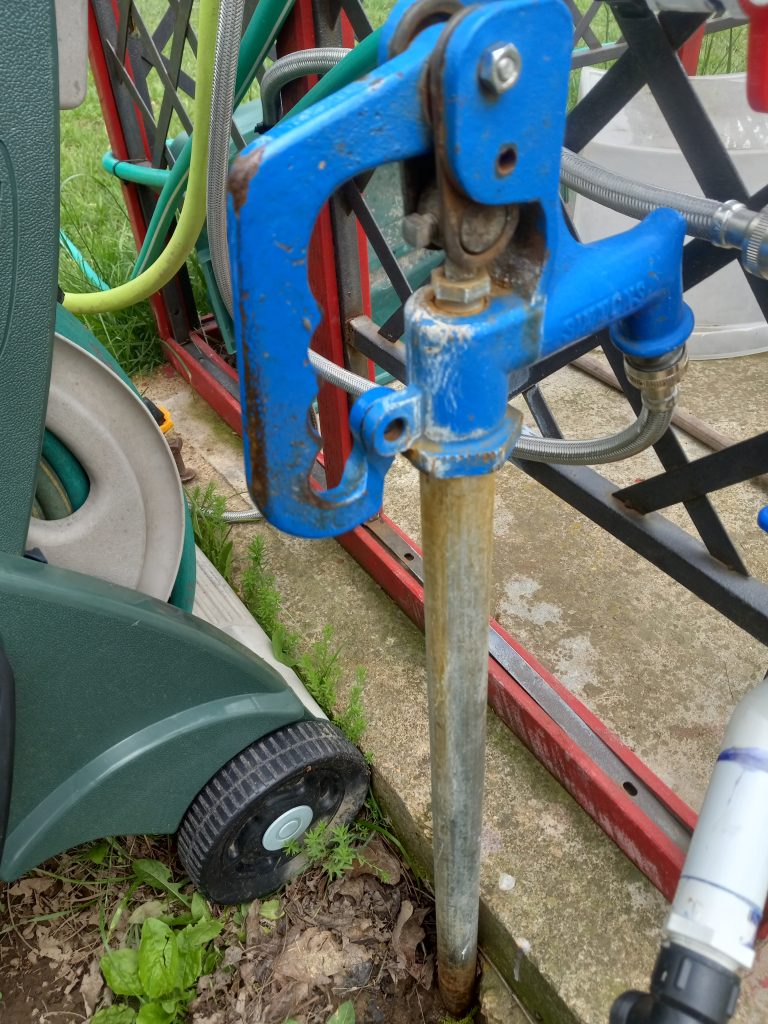
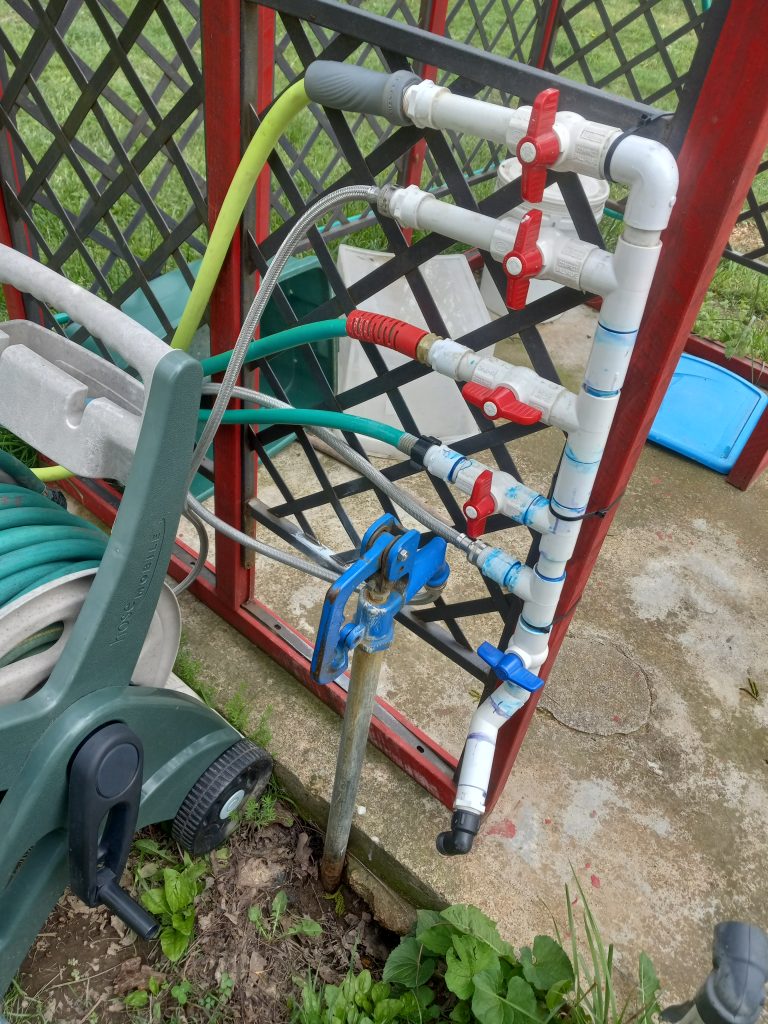
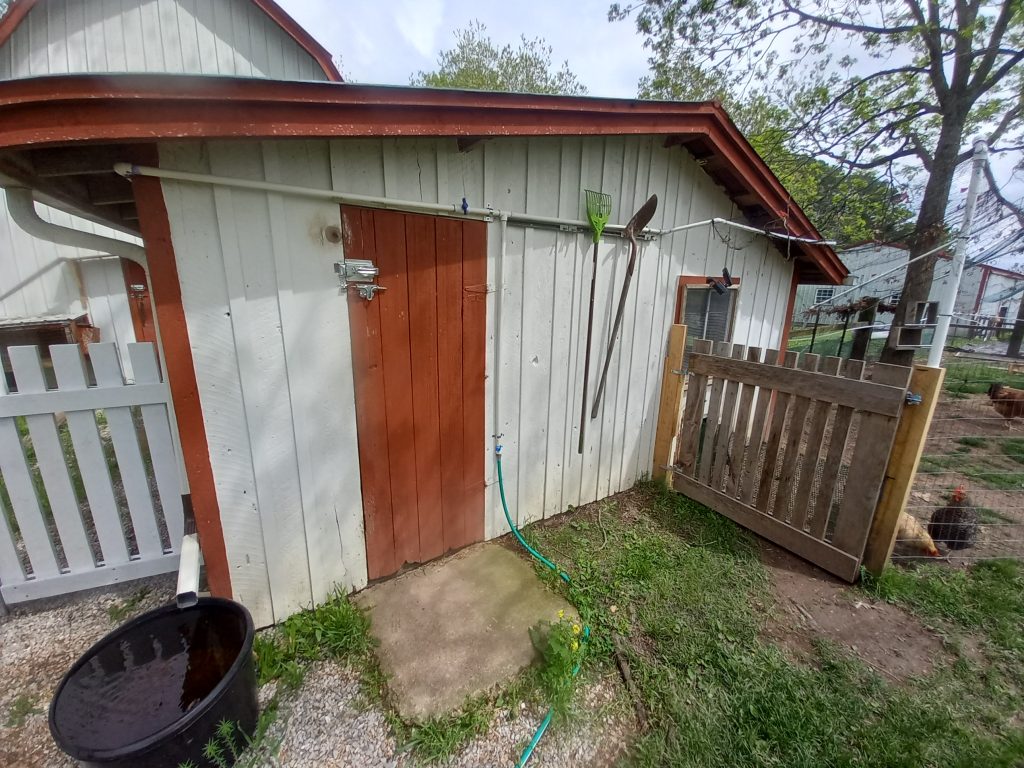
The problem is, THIS is our only source for water outside of the house. This freeze-proof spigot is located by the old well head just off the back porch.
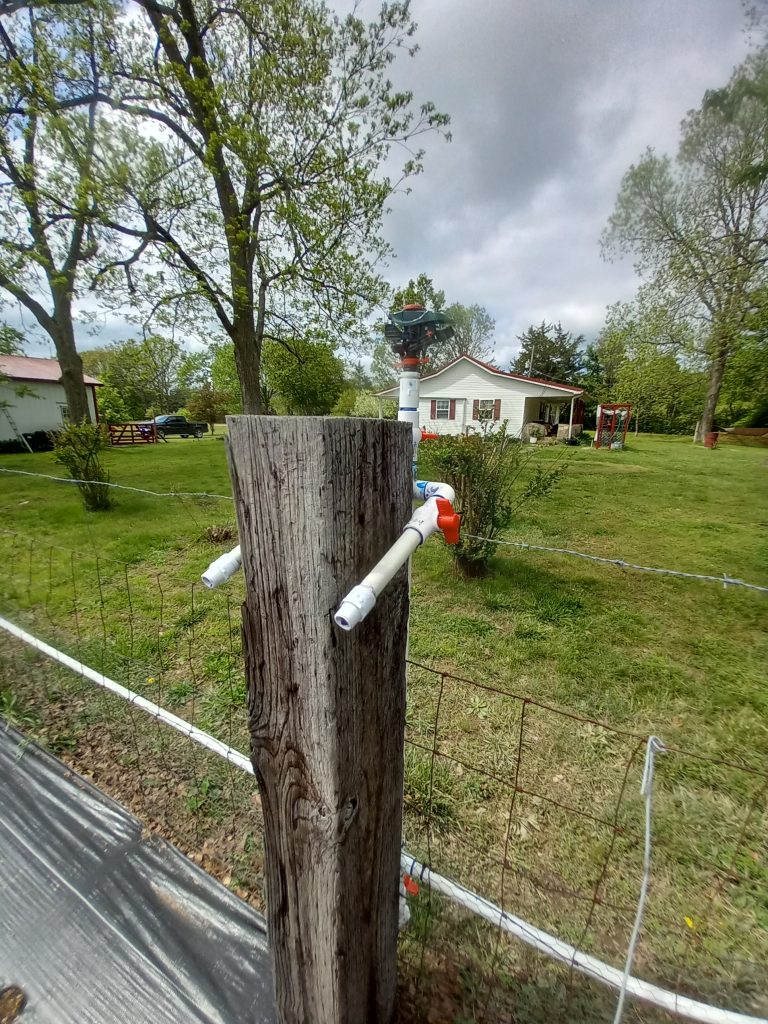
So, immediately I split this single hook up to 5 new ones using PVC valves and 3/4″ piping.
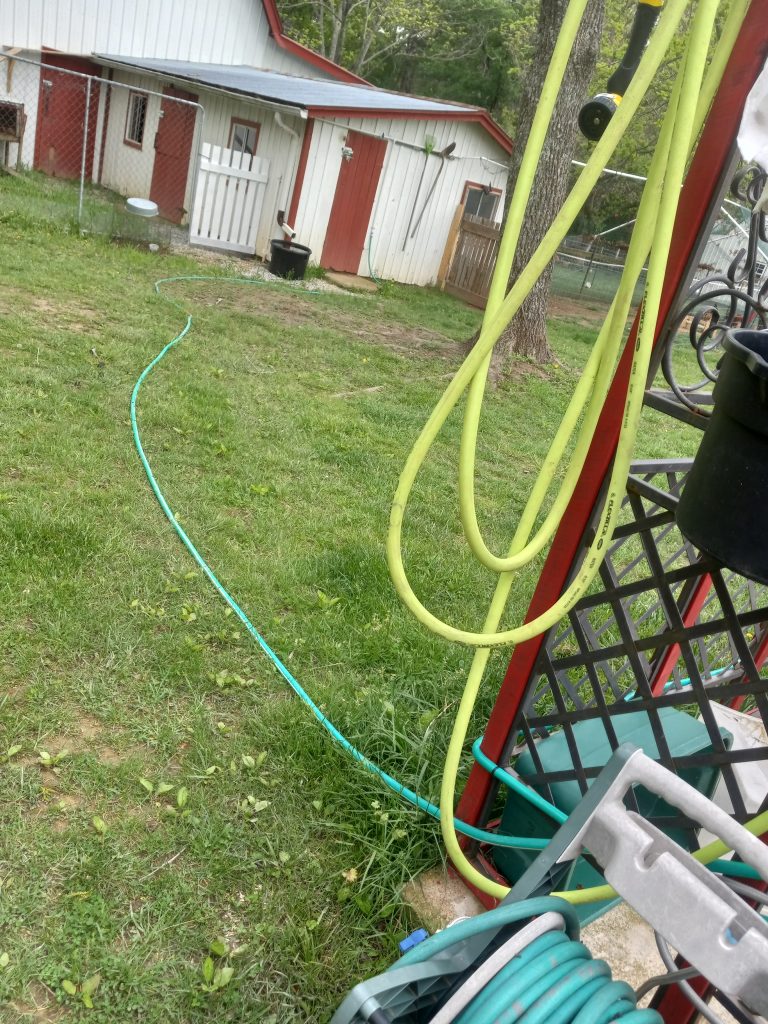
The blue valve at the bottom is used for filling buckets but doubles as a “drain” of that valve system when the water is shut off. Moving up from that valve, the next connection on the left is where the water comes from the source and enters the system. Up from there is a hose running to the outdoor shower (that this is mounted to). The next one up (turned on) is the hose that feeds the line that covers the garden as well as other locations. Up from there is the hose reel (pictured) and the top valve controls a simple 10′ hose and nozzle that hangs on the shower for general use.
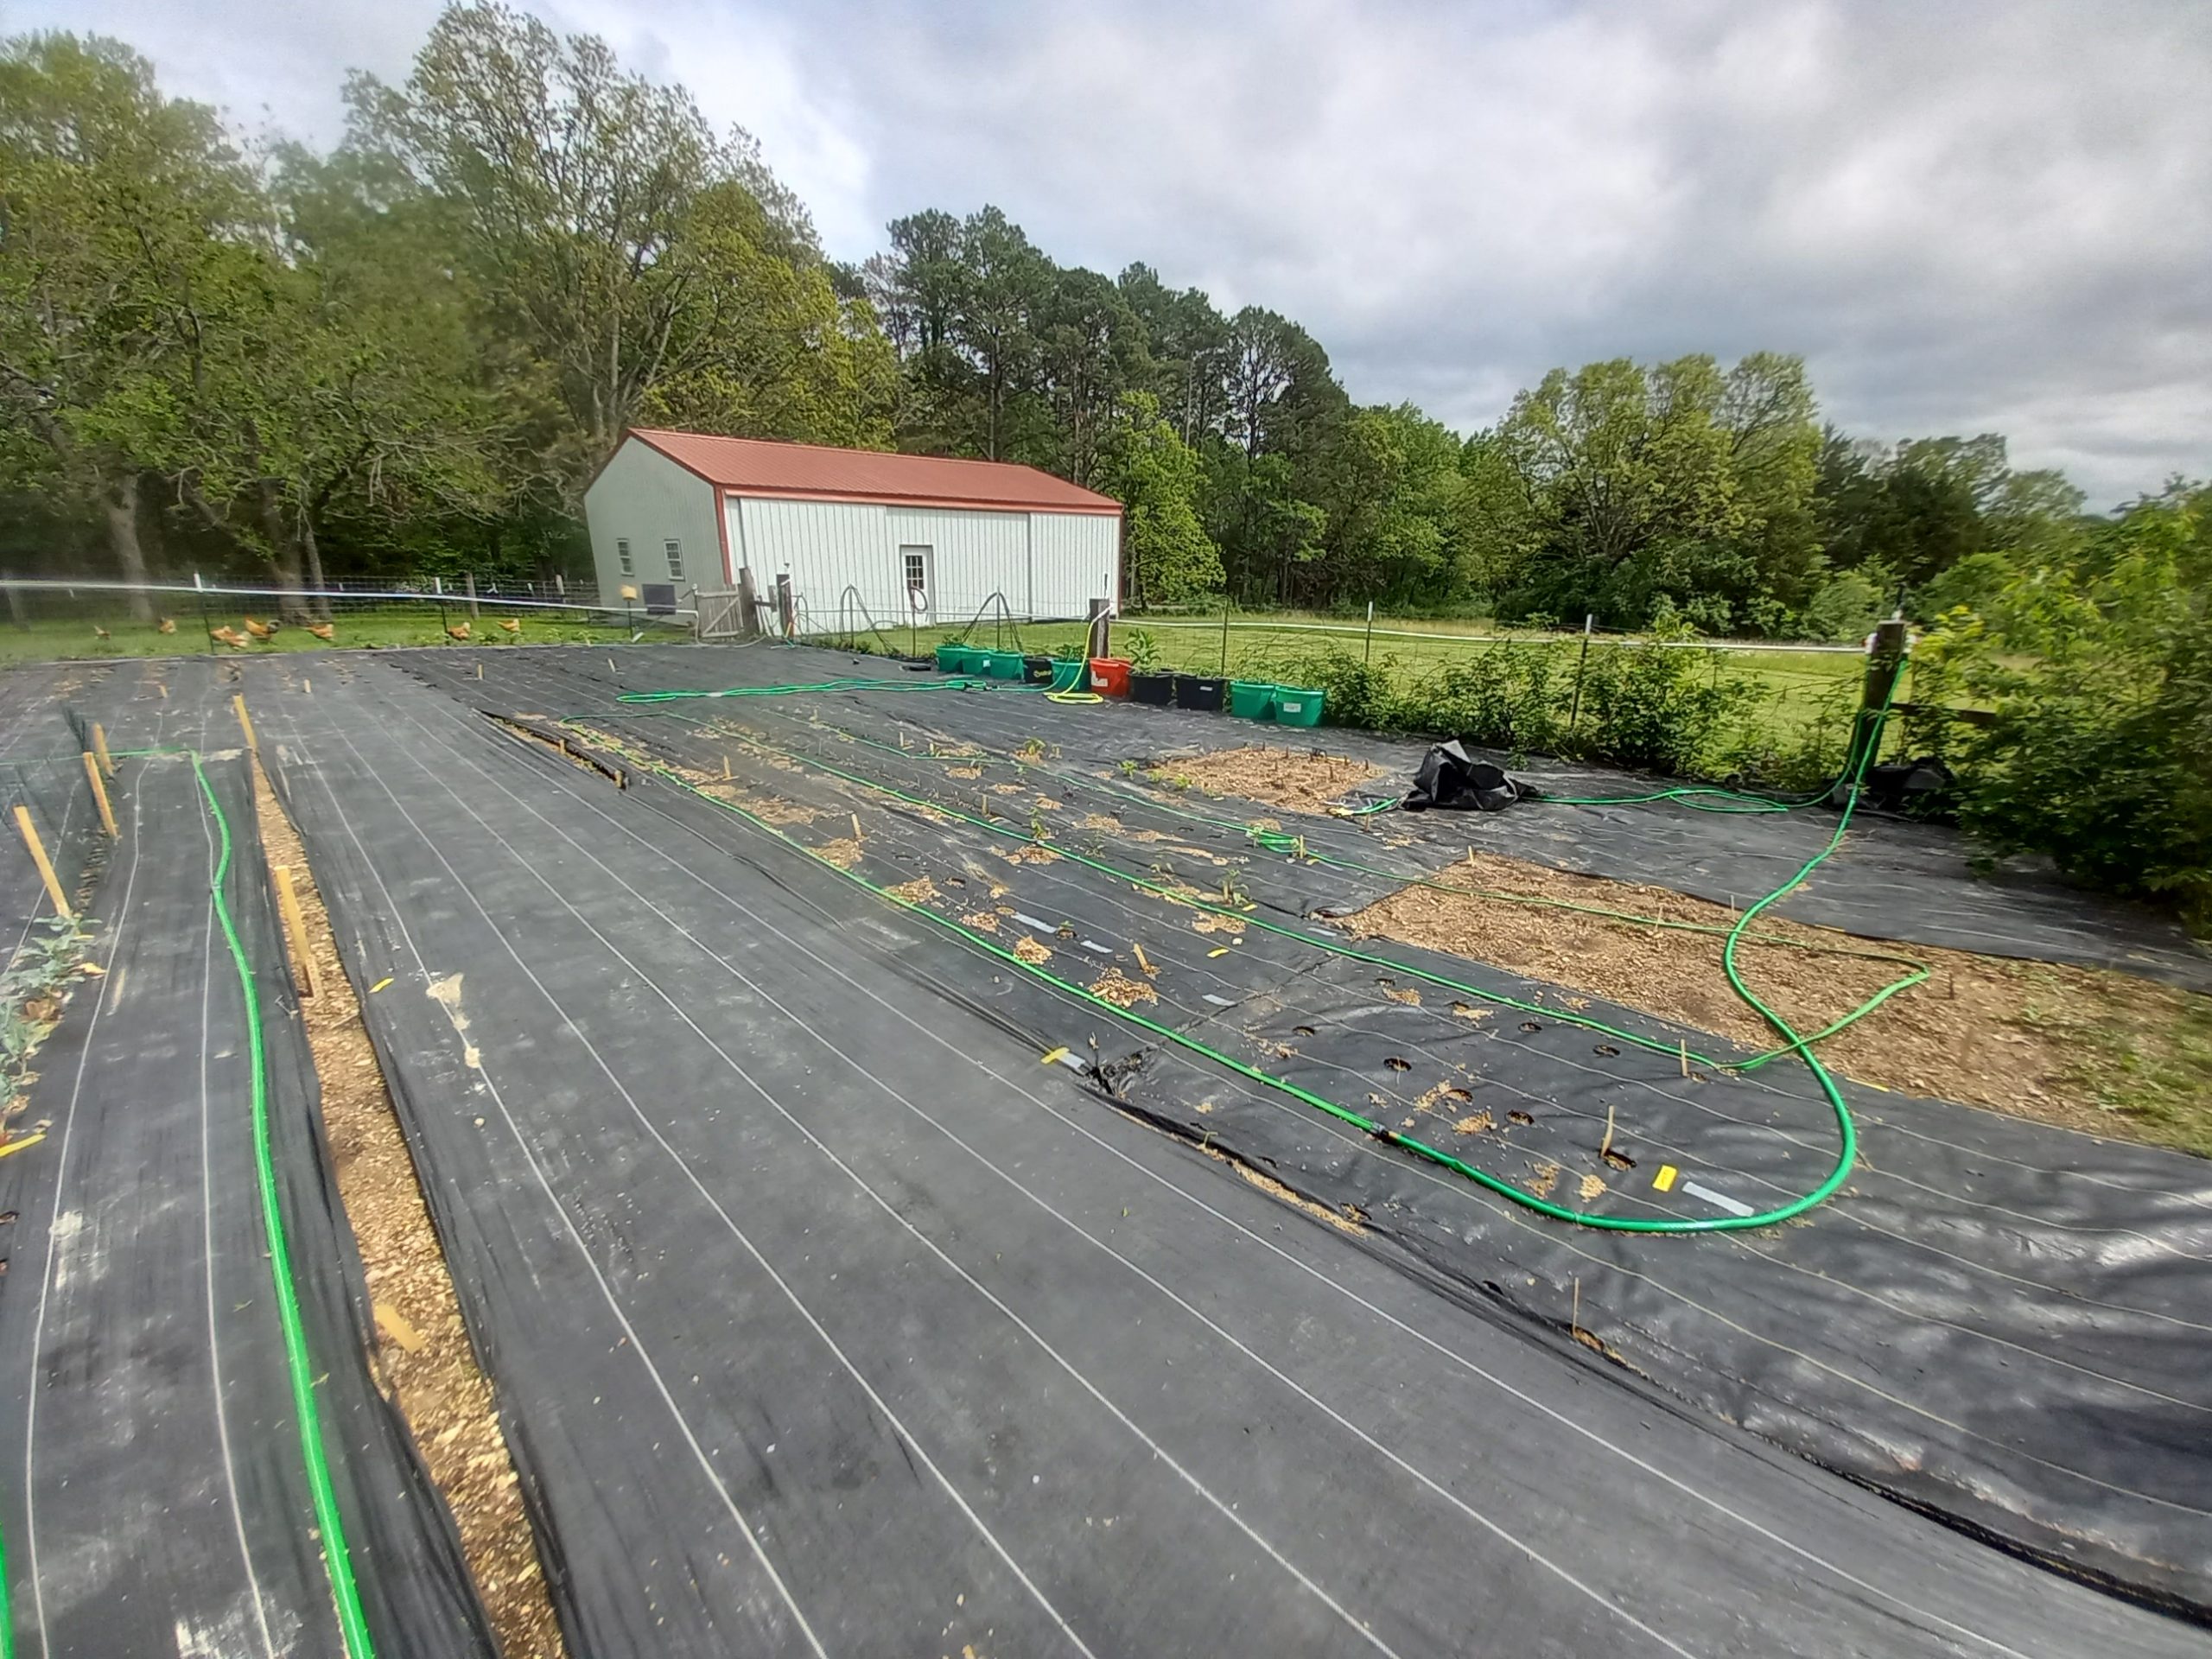
The line that covers the garden and other places runs on the ground over to the front of the chicken coop. As of now, it is a simple garden hose but will eventually be “piped” when I complete a mud free walkway back there.
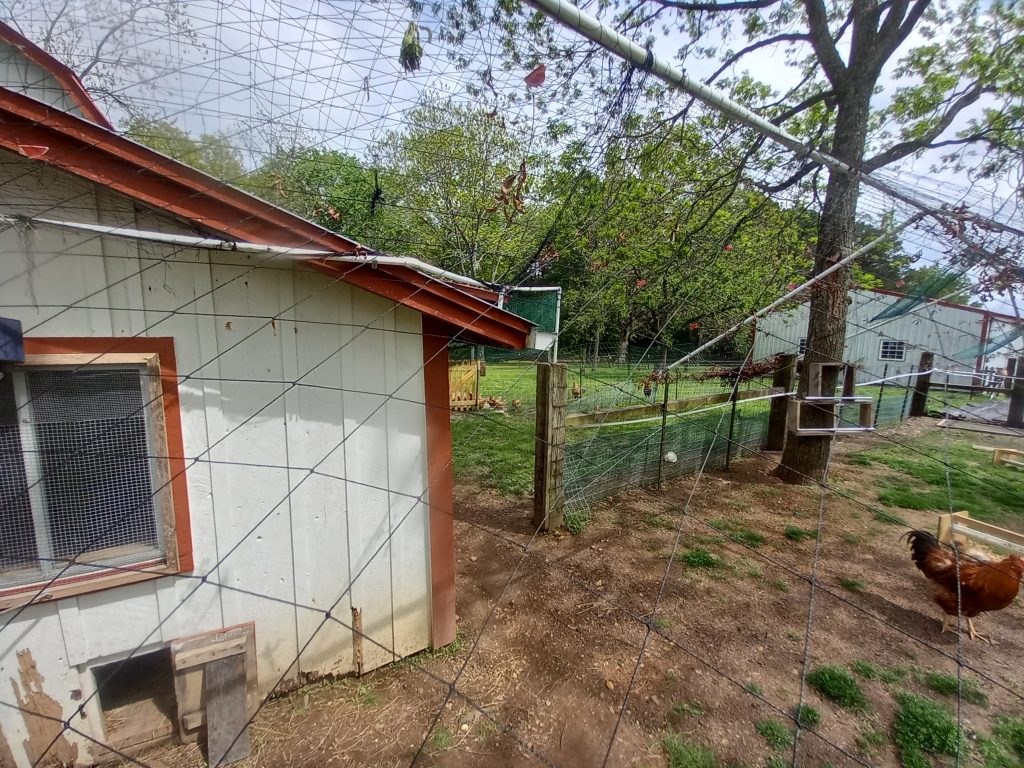
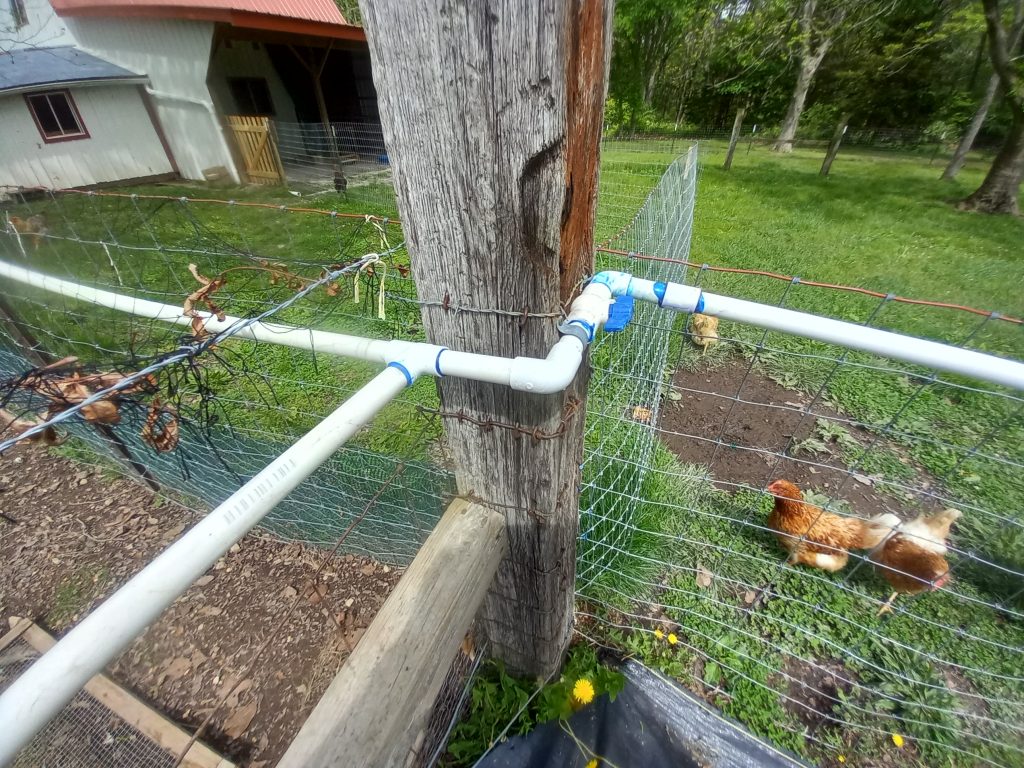
Once there, it screws into a PVC fitting and traverses up to the top of the door where a “T” connection sends a line to the left for inside the barn, as well as another that runs to our camper stored under the lean to. The other line (to the right) continues towards the garden.
The line is up so high because of the gate between the chicken runs. I’m not crazy about this arrangement and may move it to the ground but I’ll wait for it to break and force me to. Actually, this section between the runs will all be redone but works ok for this season.
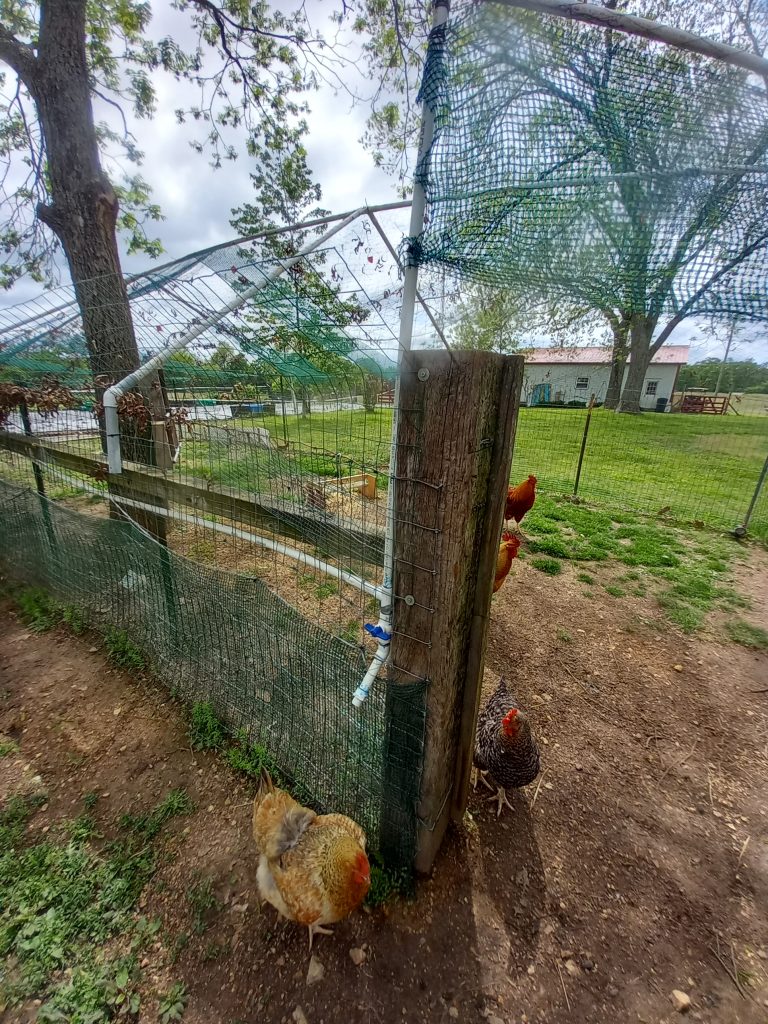
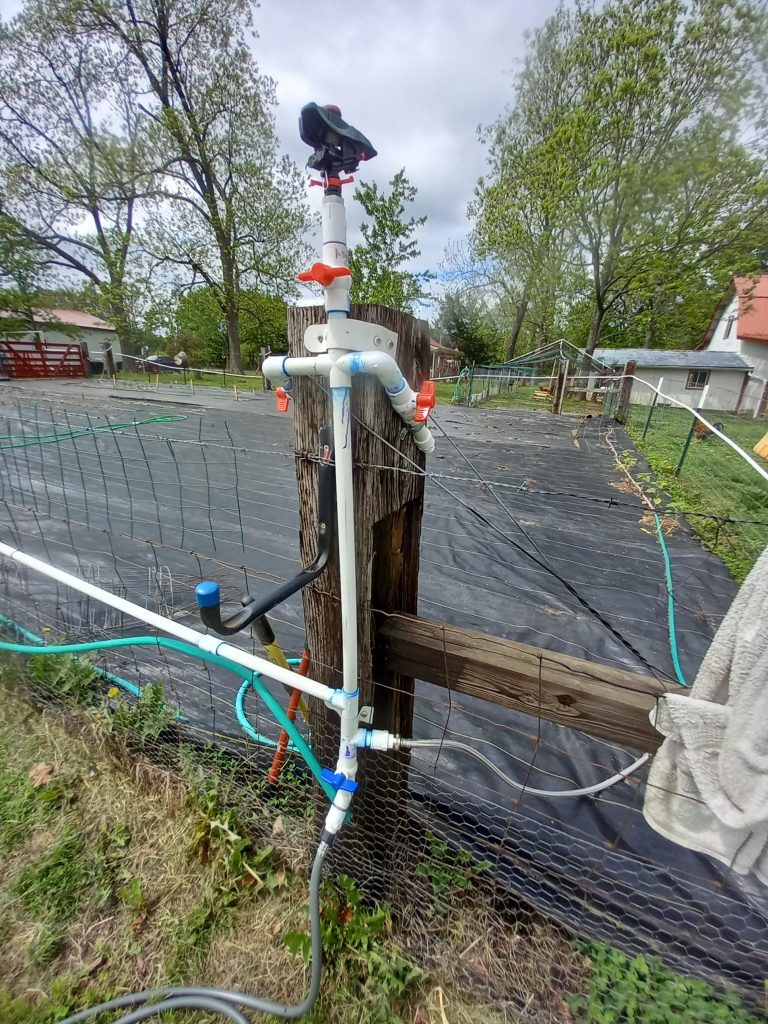
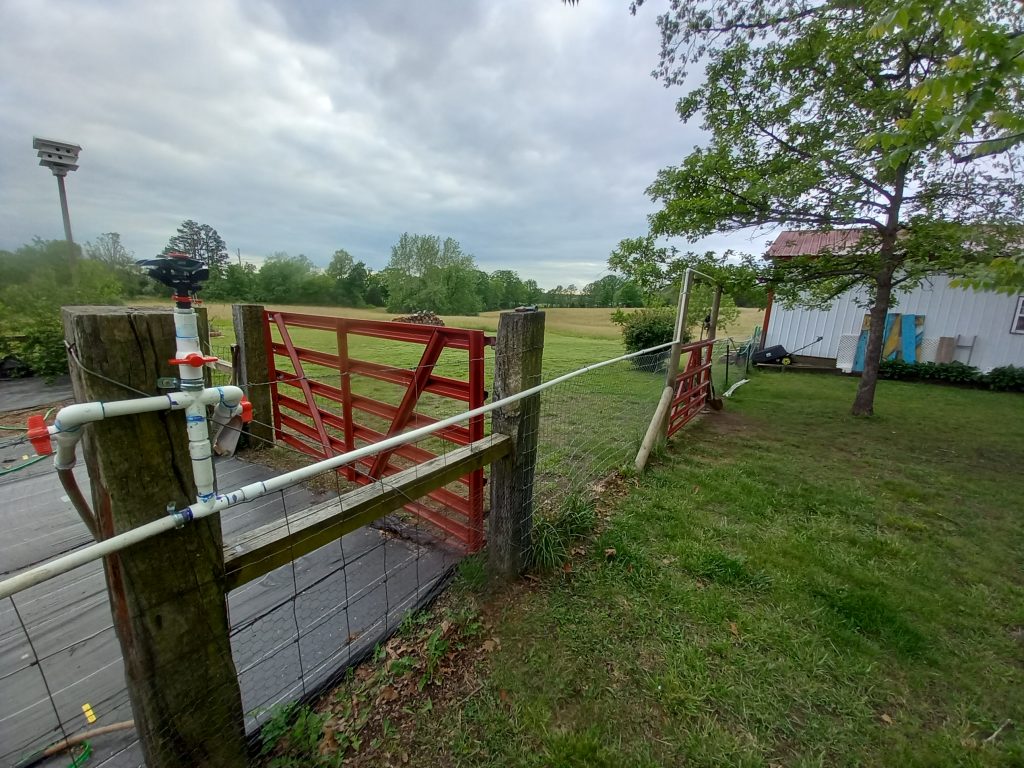
On that first post by the gate is the first faucet available. This spigot previously drained the whole system but I had to change that behavior when I added the additional footage circling the garden as it is just too much distance overall to get the slope exactly right for that distance.
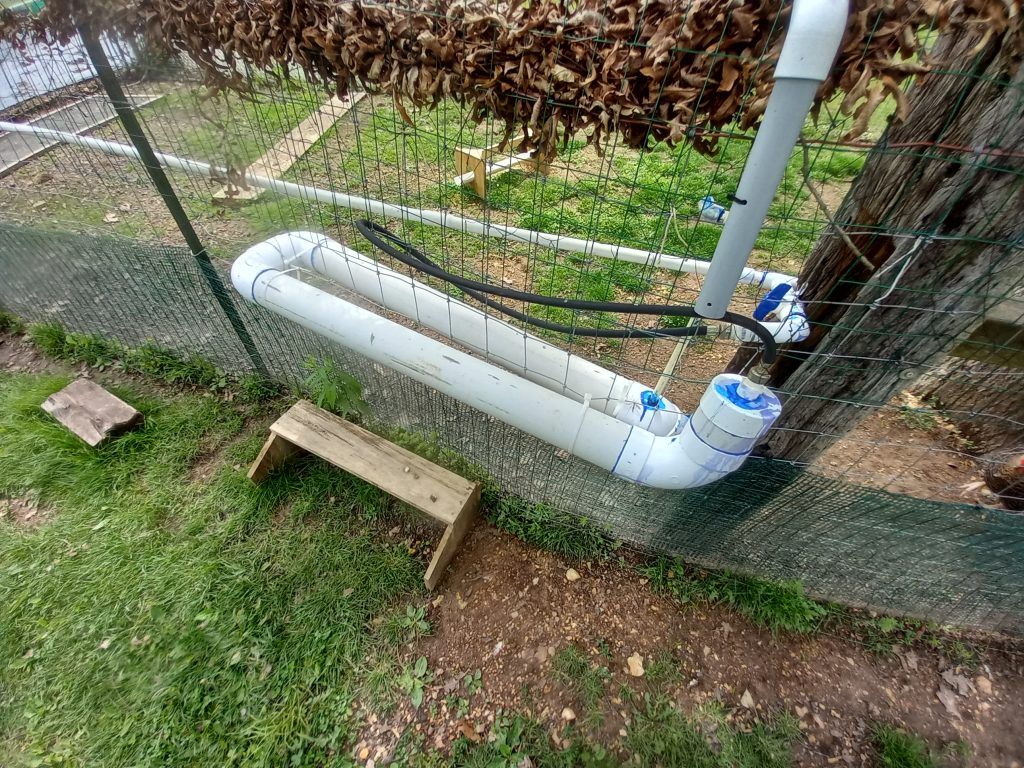
The next post down the run also has a spigot, which is connected to the birds 2-sided waterer. It takes about 15 seconds to refill by turning the valve. The older girls get their water via nipples on the bottom of the larger PVC section. The newer girls on this side are smaller so I built them a bench to reach the nipples.
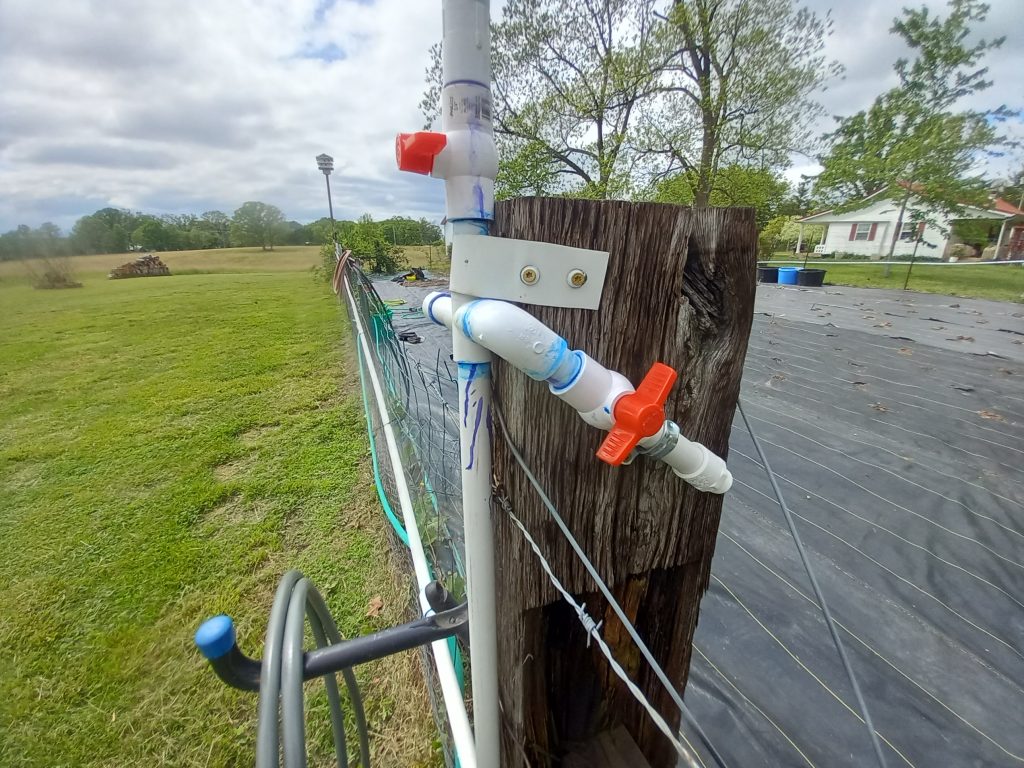
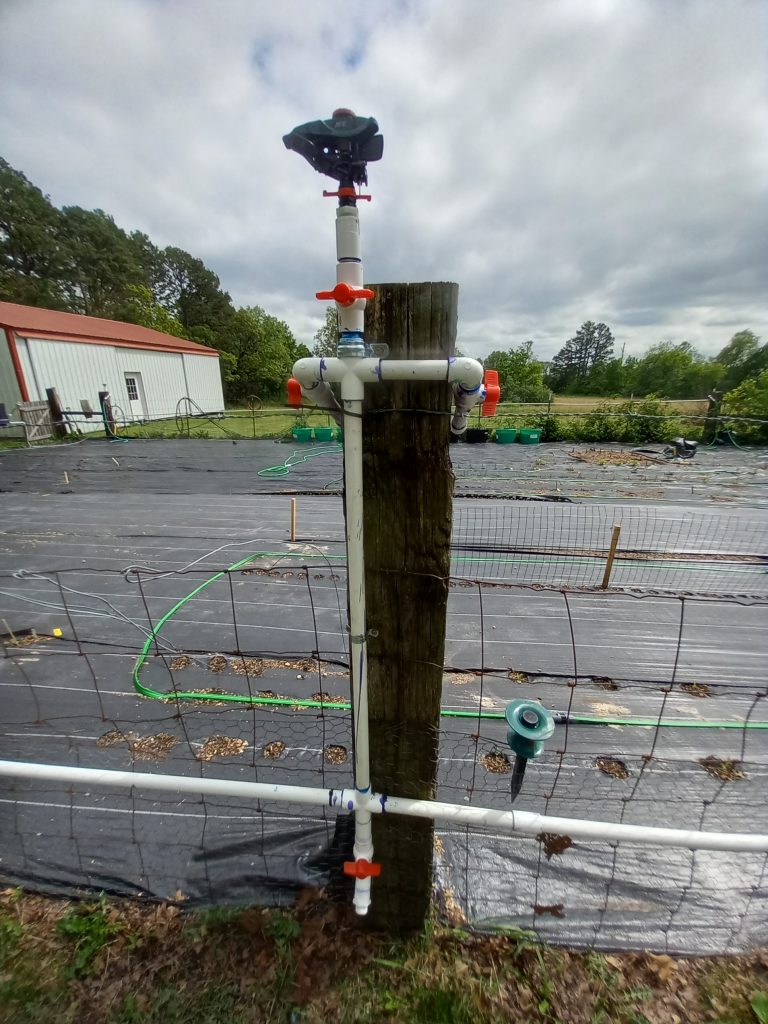
Finally reaching the NE corner of the garden. Here is another “T” with one side continuing straight south towards the shop and then turning along the south side and the other turning westward along the north side of the garden.
At the shop, there is another access gate so I dropped the line to the ground and used “water supply” hoses (typically used to hook up your washing machine or dishwasher) to hook up the south side line. There is an extra splitter valve there on the ground that will drain this “bridging” line when needed. The green hose going left is watering the sunflowers at the back of the garden.
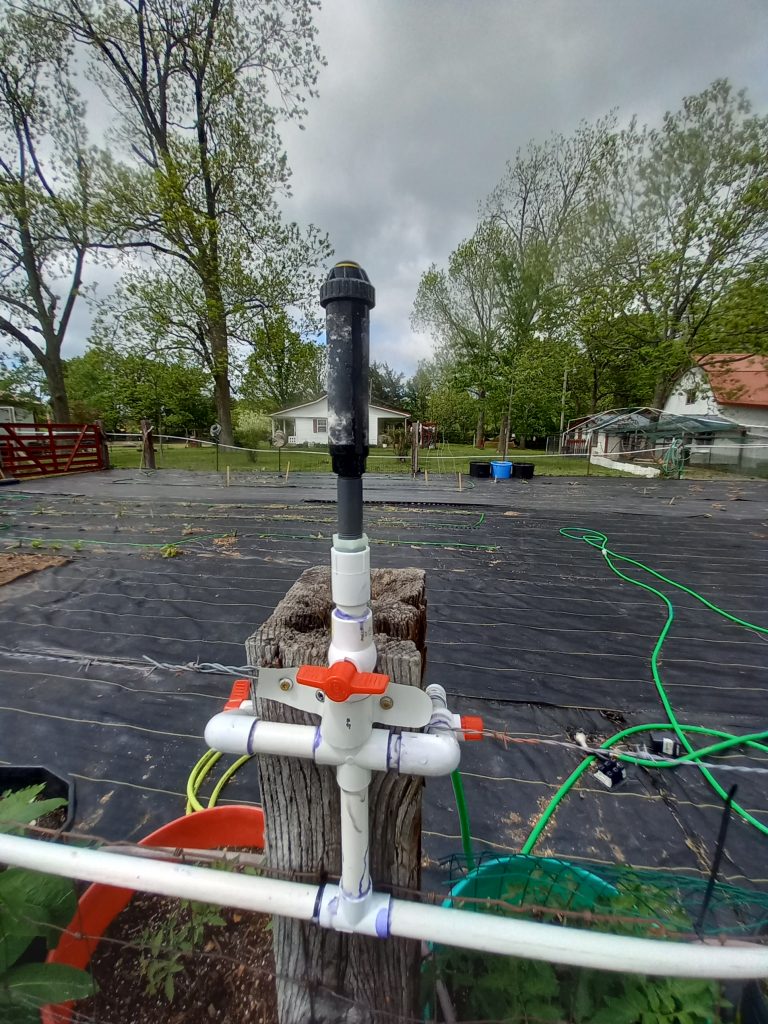
And here (going west on the south side) is the first of 6 “stations” surrounding the garden. The blue valve at the bottom drains the PVC (for freezes) but has a simple 10′ hose and nozzle for general use at the shop (where we do all of the seeding and planting preparations).
Each of the 6 stations in the garden contains a single sprinkler head that covers that section as well as 2 additional spigots for hoses and drip lines. I might have screwed this up by slanting these downward because a little water could still be trapped above the valves after the lines are drained. I may revise next year.
Moving westward, this is the station at the middle of the garden.
And, at the end of the line (for now) is another station in that corner.
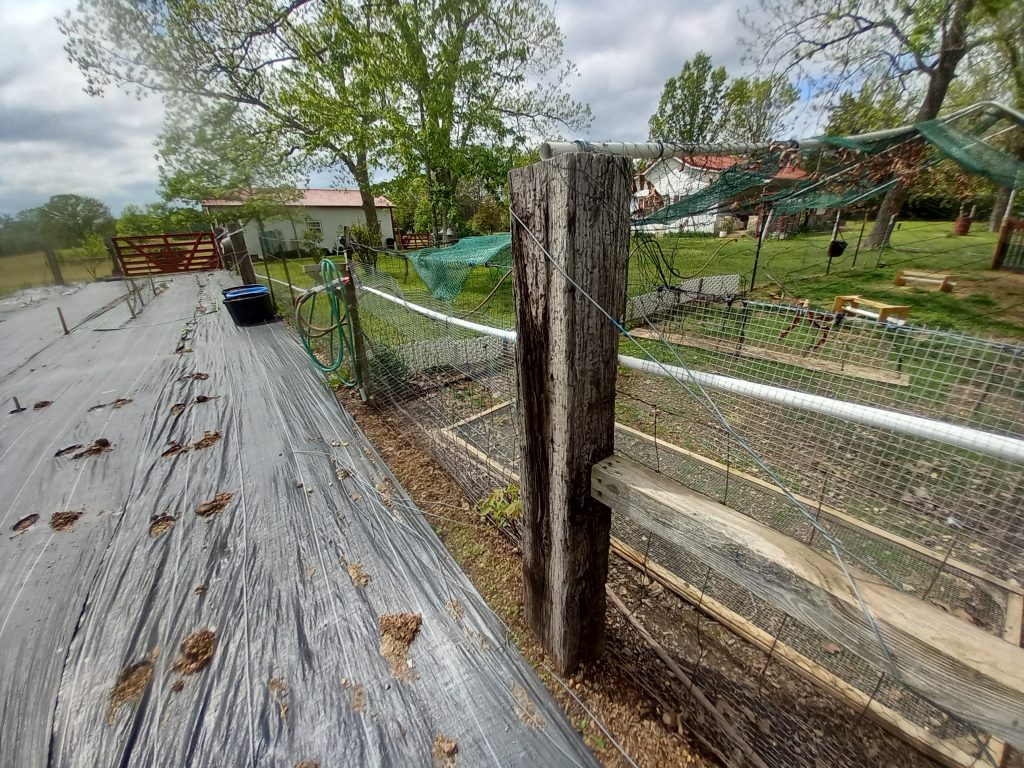
When you step back and see that entire line, you can easily see the slope that drains everything in that zone to the SE corner, where it can be drained away safely to prevent freeze damage. These sections each have their own section shut off/bypass valve so during the colder months, only the sections that are actually used need to be drained.
Returning to the split at the NE corner of the garden, we’ll now cover the north side.
This north side is a duplicate of the opposing south side. Simply 3 more stations – 2 at the corners and a 3rd in the middle.
I like the convenience of not having to enter the garden to “water the birds” so I moved the first station on this side to the edge of the chicken run and mounted the station to a makeshift piece that is banded to a T post.
The middle station.
And the final station at the NW corner. This is also the low point in this zone so it has a spigot to drain the line (or use otherwise).
But, instead of terminating, you see the line continues further to the right (because there is more to cover).
Exiting the garden, the line has to traverse another gate opening so it elevates up over the top of the posts. That elevation creates a 3rd zone going downhill now towards the garage and then turns along side it towards the front. The spigot at the garage front will be the low/drain point for this 3rd section.
As soon as it comes down again after the gate, there is a valve for another hose reel. This is used for brush fires or other needs out towards the field.
The next stop along the line is the compost piles and worm pit so there is a spigot there before the line turns north along the garage.
And then FINALLY at the front of the garage is the final spigot for this line for washing vehicles or other garage uses.
I believe we took delivery of the new generator in October and just now getting around to hooking it up properly. Since Sherry is up in MN visiting family and friends this week, I figured this was a good time to get it hooked up to the house.
I do relish these projects when she is gone. Once, when she went to CA to see her brother, I took down a wall between our kitchen and living room. That was quite the mess to come home to but it was all worth it in the end.
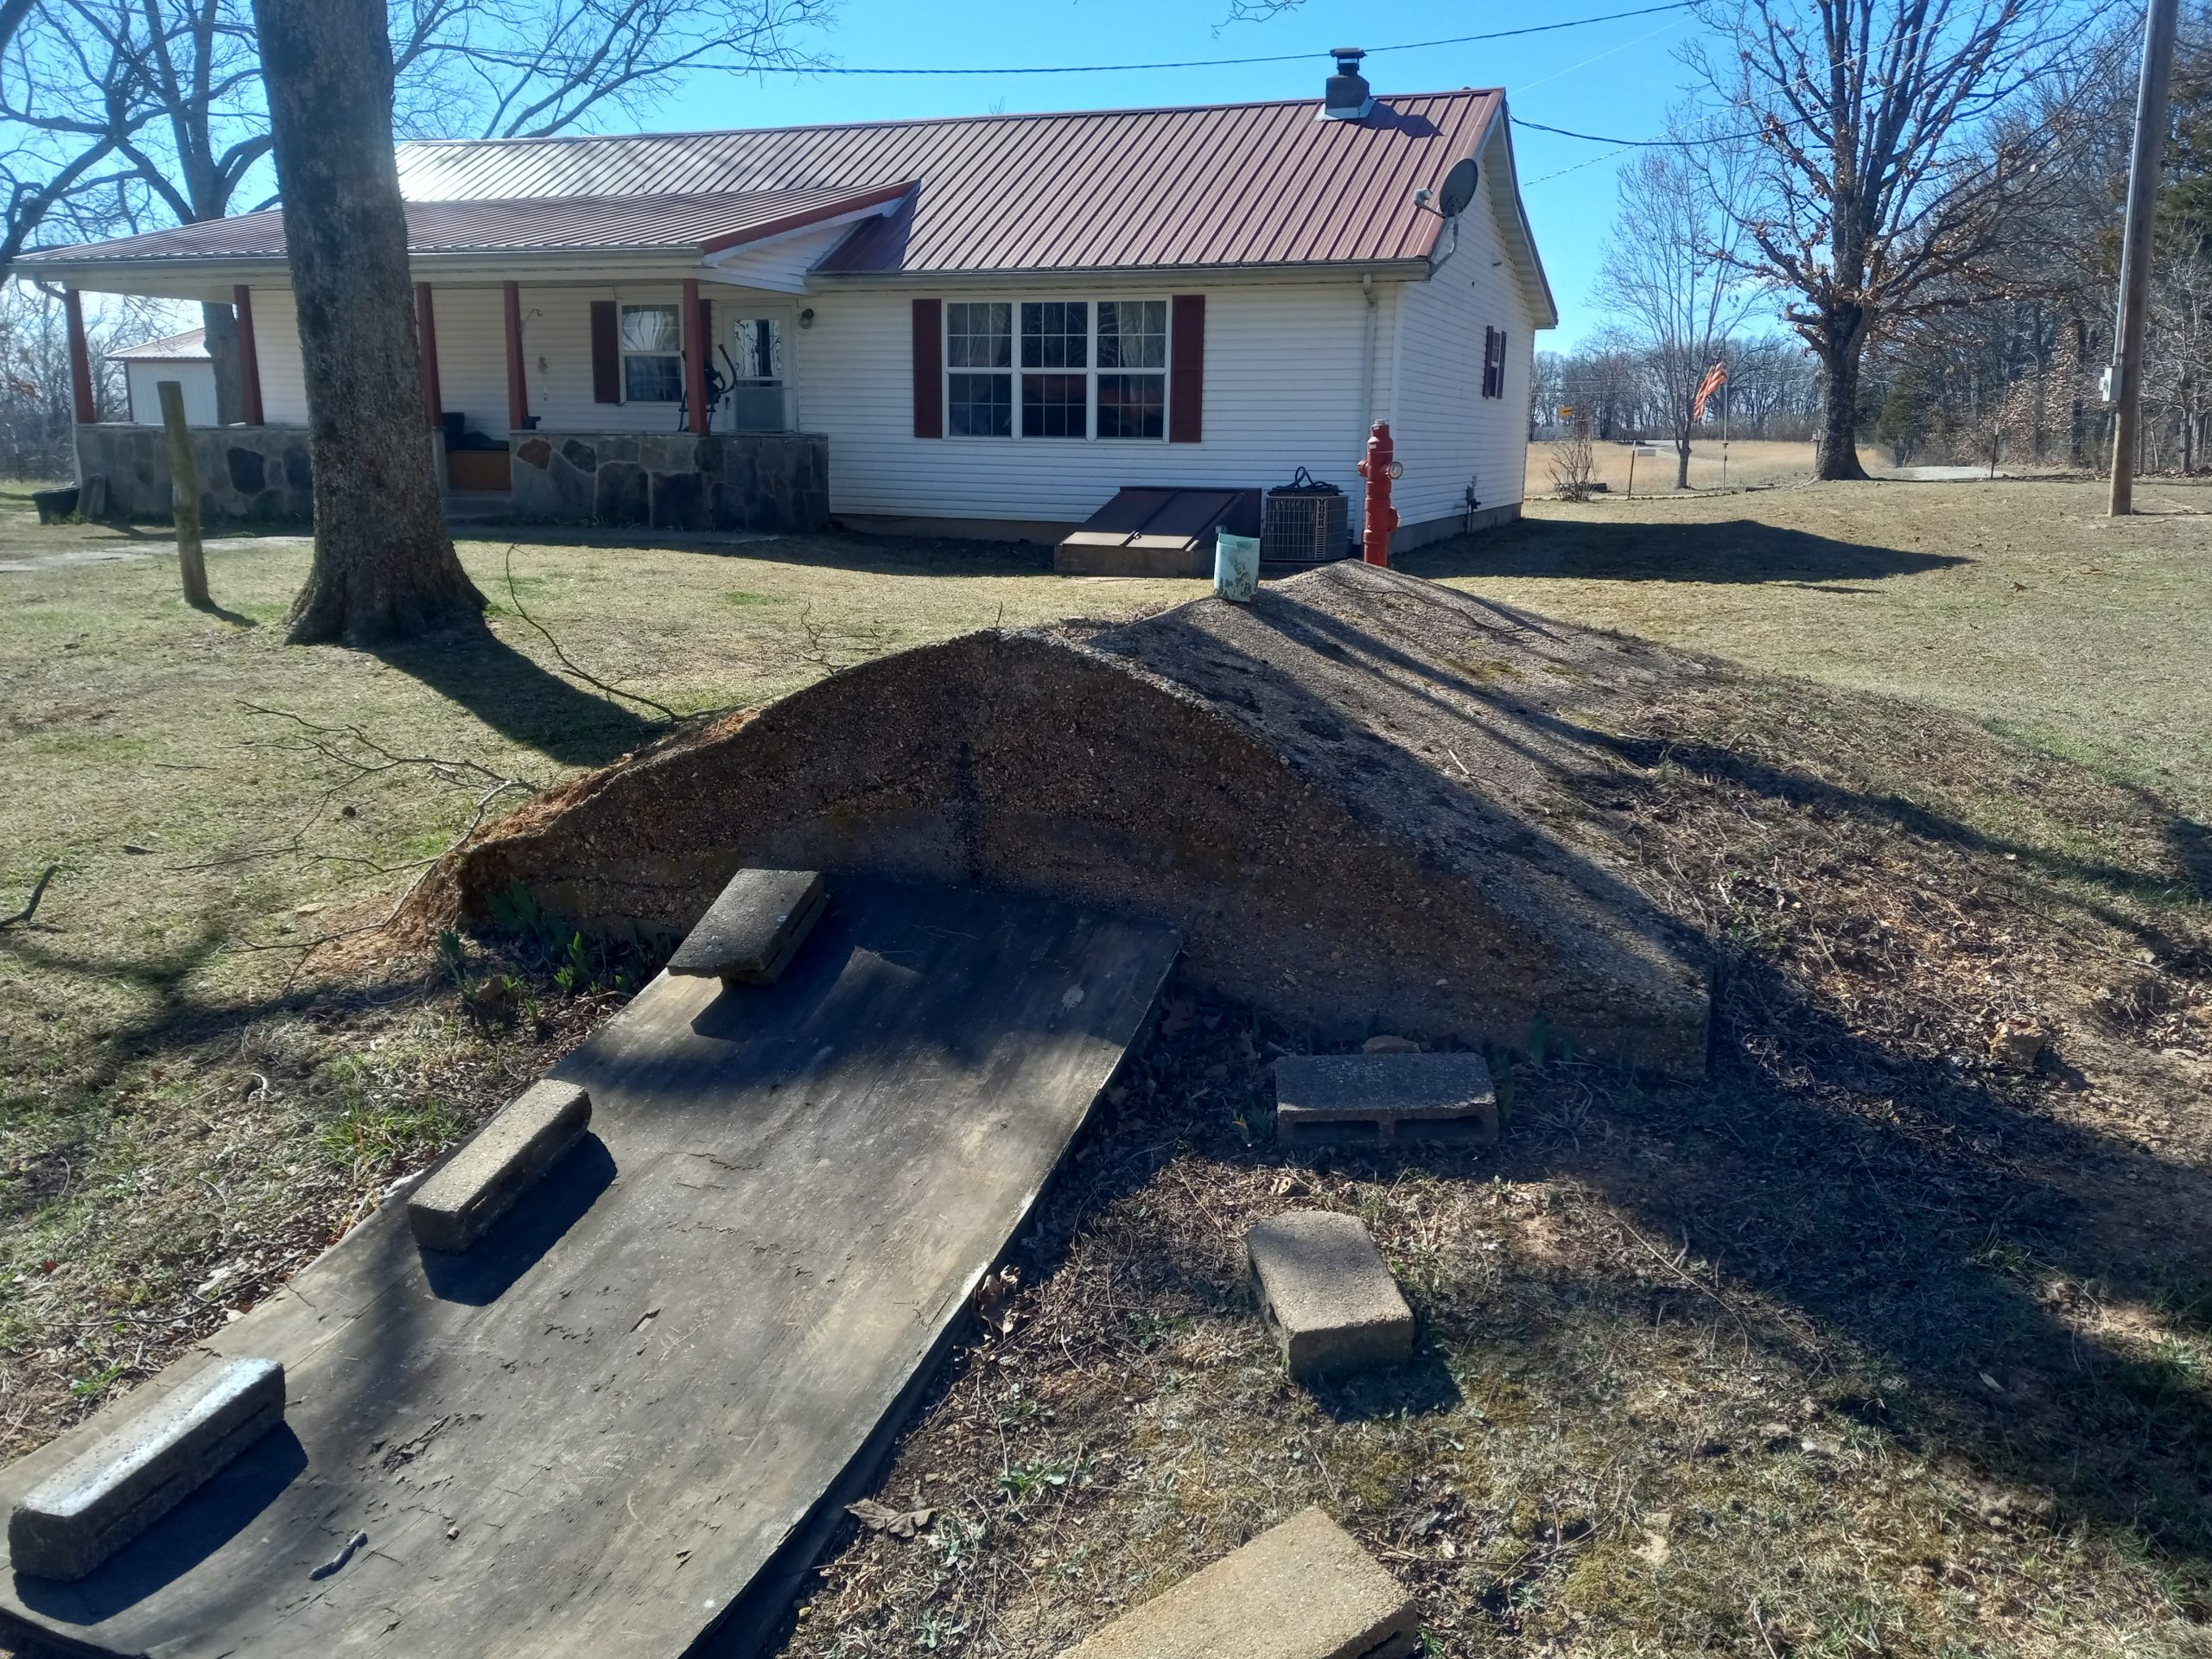
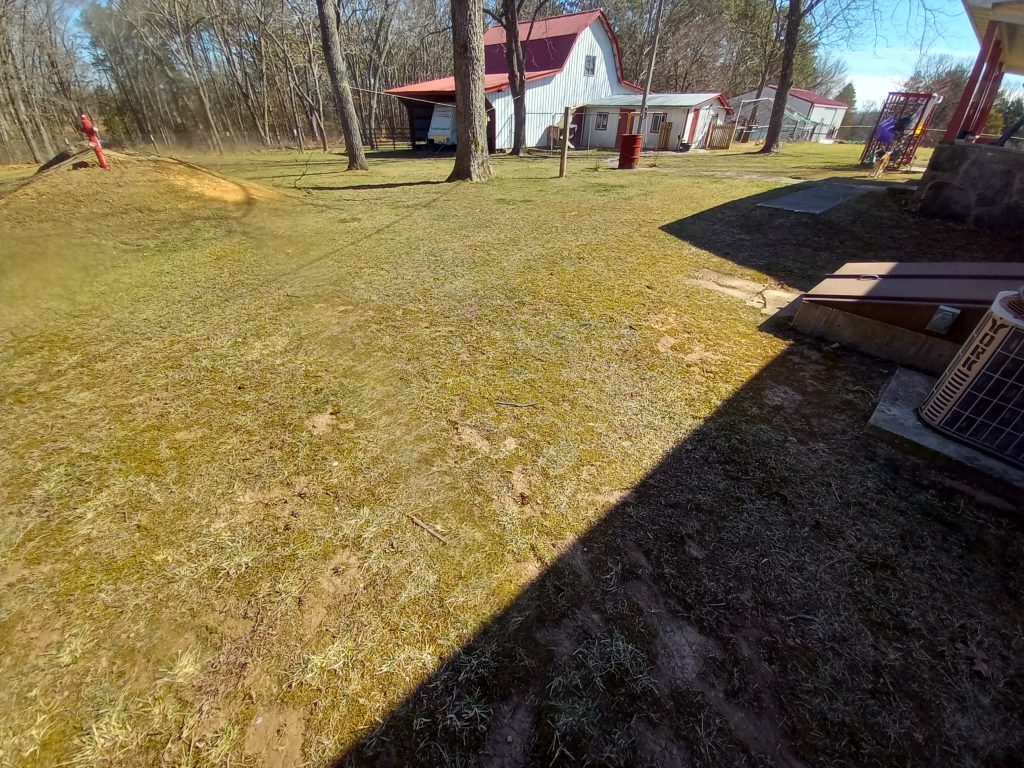
This storm shelter sits about 40′ out behind the house. With the basement dug out in the house, the shelter was no longer needed and sits unused.
I was also surprised to learn that generators are NOT weatherproof and need to be protected from the elements so I put 2 and 2 together.
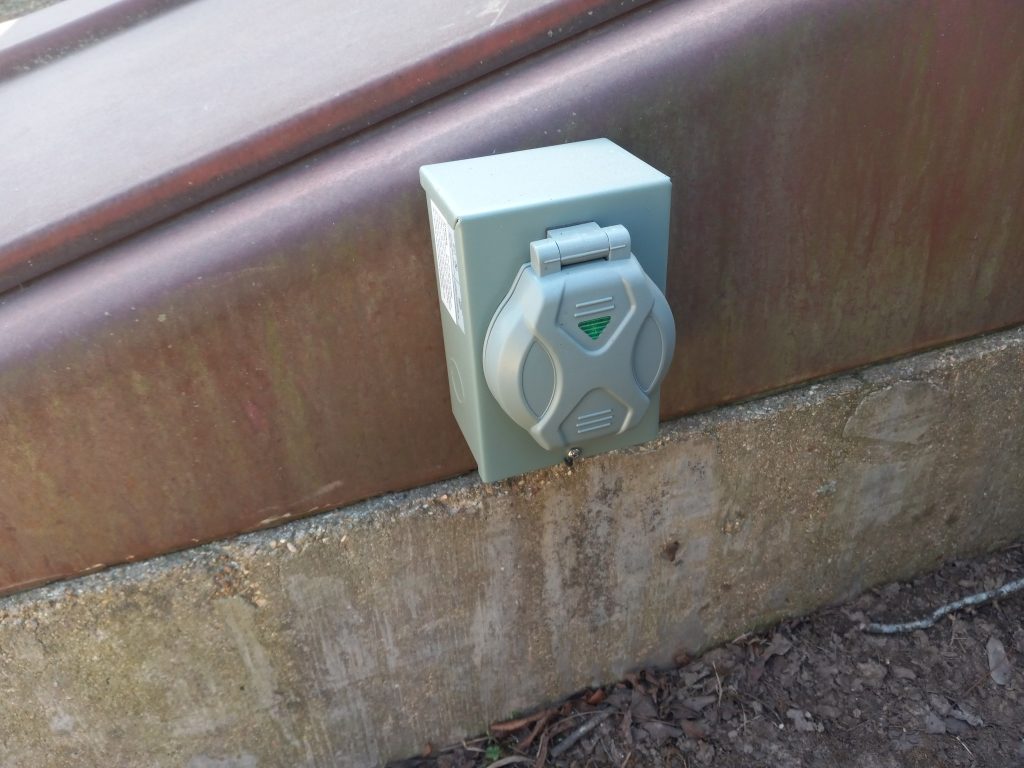
I mounted an access box to the exterior stairwell enclosure. The generator will plug “in to the house” here.
This will handle 120v/240v and 50 amps. From this box, I ran 6/3 NM-B, Non-Metallic, Sheathed Cable back to the main fuse box in the basement.
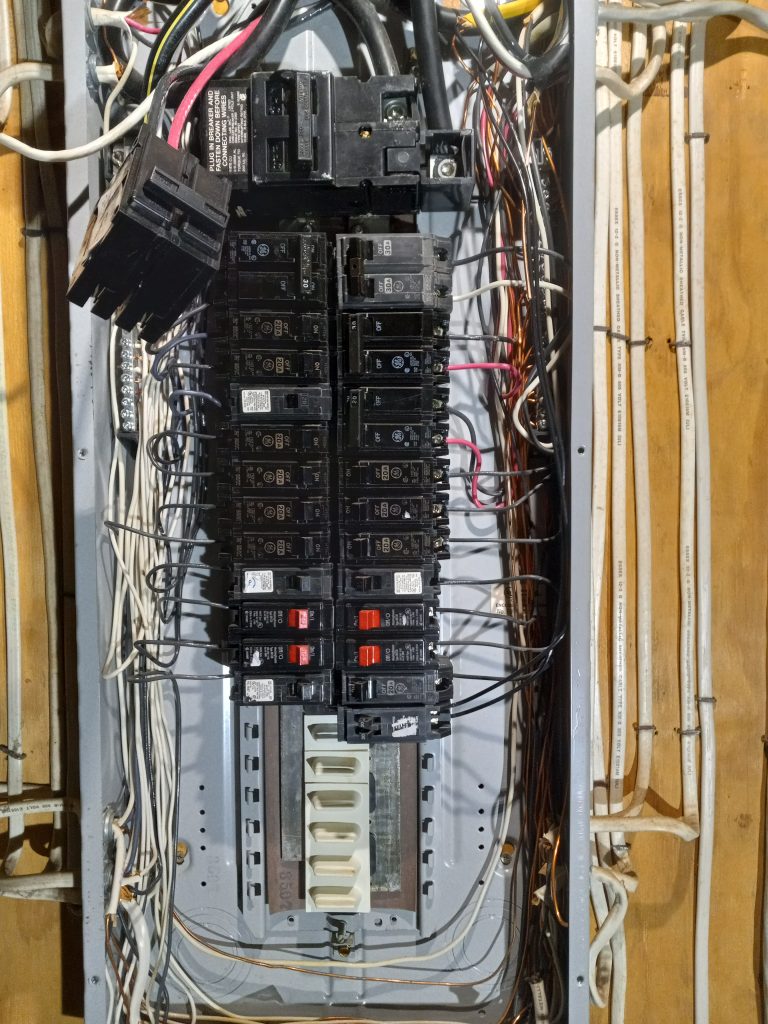
Here, I’ve got the new cable entering the box, all the 4 leads cut to length and stripped and the new 50 amp breaker wired up and hanging loose in front. I had to do this all VERY CAREFULLY with the power still on. However, at this point there was no going any further so turned off the main breaker and ran a long extension cord from the barn to light up what I was doing next.
I shouldn’t be surprised that the only 2 available spots to mount the ground and common wires were in slots with stripped screws so had to combine a few of the smaller gauge wires to free up room for the big fat 6 ga wires. But, I got them all securely installed.
Then of course, because of the lock out device, I had to install the new breaker on the left side just below the main breaker, which meant everything else on the left side had to slide down 2 slots to make room. Luckily, they all had enough wire “play” available to easily move them down a few inches to make room.
This “lockout” device protects power company linemen from getting zapped while working the lines during outages. It assures that power you are generating is NOT sent out to the grid and is isolated to your house only.
This is a temporary solution as the goal is to energize the entire farm (4 buildings). For that, I’ll need a similar hook up box for the power pole where our meter is located. That will be coming in April from our electric cooperative.
Now, I’ve got to figure out that secure door to the shelter.
In a little more than a year, we’ve accomplished quite a bit. Our constraint is trying to not outspend our limited retirement income. Even so, I think we’ve made considerable progress. Here is what has been completed so far. (Some of these are displayed on the “Tour” pages).
FENCING Immediately after the move, we added fencing to keep our domestic animals in check. Mostly due to the fact that the previous owner (Harvey) mentioned losing 2 dogs to “the highway”. Even though that is a considerable distance from the house, we couldn’t live with losing one of them so the 1st order of business was putting up fencing around the farmstead (farm buildings) perimeter. The dogs are now contained but Lola and Luther (the cats), can still jump through the gates but they never venture far.
MORE FENCING To accommodate the 1st batch of chickens, we added a chicken run to the front of the coop and covered it with netting so they are well protected from critters (both winged and not) that may be out to get them.
ANIMALS We moved in with 1 dog and 2 cats. Since then, we’ve added 2 more puppies and “nature” provided us with an additional 6 feral cats. We also started with 12 baby chicks this past spring that resulted in 8 roosters and only 4 (laying) hens. We added a 2nd batch of 10 more hens and culled/sold a few of the roosters so now at 18 birds in total.
WATER ACCESS With a single outside spigot available, we’ve added significant water piping (pvc) with valves at numerous locations to fit our needs. The only downside to this is the need to be diligent protecting against freezing. I intentionally put a slope in all piping so when needed, turning a single faucet will drain the entire system.
MOWING With about 4-5 acres or so to keep in check, I rented a zero-turn mower for the initial mowing last August as my 2 lawn tractors are in various stages of disrepair. That convinced me to bite the bullet and purchase a new zero-turn mower that makes the job much easier and quicker.
SPROUT HOUSE To get an early start on planting, we used the (currently) unused but insulated shop space to build a small Sprout House, complete with grow lights. Plans are eventually to put up a greenhouse to extended growing season even longer. We also still have live veggies growing (in January!) by keeping them on a trailer that is wheeled in and out of the shop each day.
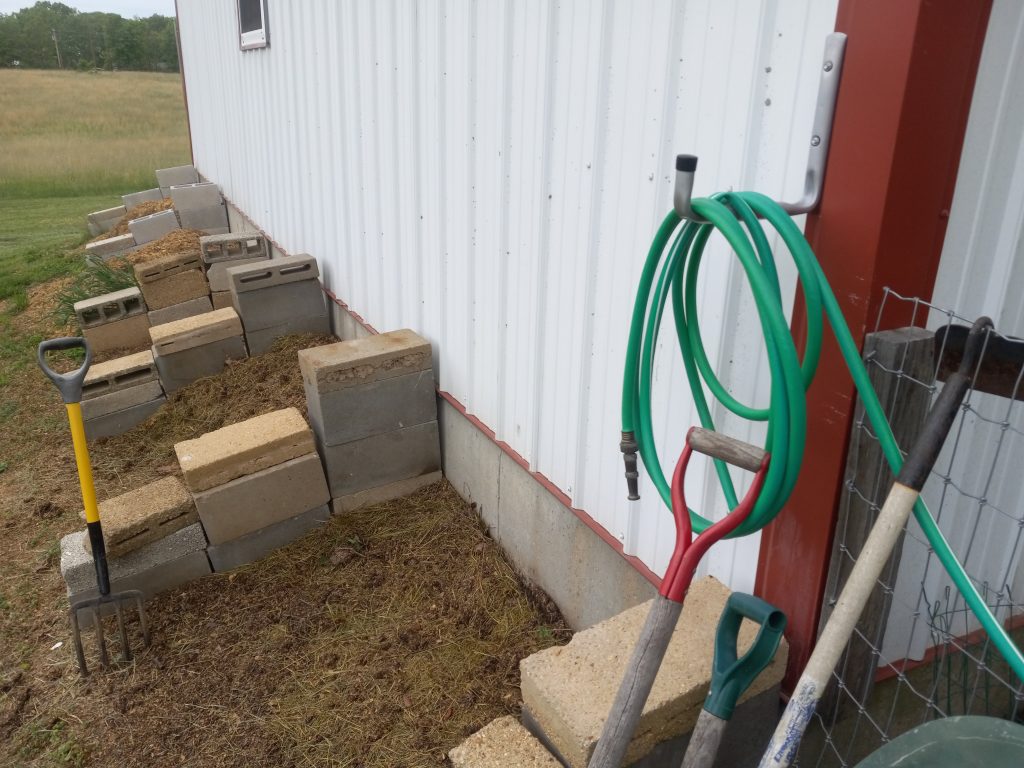
COMPOST We now have 3 compost bins going. Fueled with kitchen scraps, chicken manure, leaves and an ample supply of sawdust, these are rotated so we always have some available for our needs.
HAYLOFT > THEATER Moving in with an empty hayloft (and no way to load it up again), we emptied it, cleaned it up and turned it into a movie theater w/surround-sound that we can use when the temperatures allow.
WIFI/NETWORK Using a cellular modem for internet connectivity, I’ve extended WIFI capability to all 4 farm buildings when we need it.
GENERATOR Anticipating frequent power outages, we purchased a good sized generator to keep everything up and running. Luckily, the grid power has been surprisingly stable (so far).
POOL We always have a swimming pool. For this spot, we purchased a 12’x20’x48″ above ground that worked well this past summer. Plans are to bury it halfway in the ground to allow easier access.
RAINWATER COLLECTION When we do the digging for the pool, we’ll also put in some piping for rainwater collection. For now, we collect from the gutters into individual tubs that are used for the plants around the house as well as the favorite drinking water source for all the pets. Those gutters will be redirected to fill our pool during the spring rains.
SHOOTING RANGE We found an area behind the shop that is ideal for target shooting. It is out of the wind and protected from the rain.
FLAGPOLE Finding an old 1″ iron water pipe in the barn (I reuse everything), I got it anchored/cemented into the ground and now serves as a flagpole at the front of the farmstead – illuminated overnight by solar lights.
FIRE PIT It has moved a few times but we finally determined it’s where we want it so I build a brick enclosure to make it permanent.
WOOD SHOP Part of the decadence of this property is SO MUCH ROOM!!! With that, a section of the 6-car garage now houses a sweet wood shop where I can finally utilize all of my tools without rearranging cars and junk to get at them. Another bonus is an Amish sawmill across the road that keeps me in building materials. They also deliver my goods via a horse drawn wagon.
MARTIN HOUSE One of many creations now that I have the time and space to complete them. I’ll be adding a few more of these to help control the bugs.
That’s a pretty good start. Listing all them here wore me out though. I think I need a nap. There will be plenty more projects in the future to keep us busy.
If you (like many) are worried about the “end-of-life” announcement about Windows 10 (or earlier versions), but cannot upgrade to… Read more: Out The Window(s)
Today was the annual springtime plumbing day. With an extensive above ground PVC plumbing network, periodic repairs are a necessity.… Read more: On The Job Training
Discussion Categories
Email me at[wjgoodman@good4us.net] for other categories you'd like to see here.